Tuesday, April 22, 2014

UCS bug CSCun10760 Legacy CD/DVD” not “Local” or “Remote” in your boot order policy

CSCun10760.  The workaround for this issue is to set "Legacy CD/DVD” not “Local” or “Remote” in your boot order policy (see screenshot)
https://supportforums.cisco.com/discussion/12146621/service-profile-resource-issue

http://www.cisco.com/c/en/us/td/docs/unified_computing/ucs/sw/gui/config/guide/2-2/b_UCSM_GUI_Configuration_Guide_2_2/b_UCSM_GUI_Configuration_Guide_2_1_chapter_011111.html#concept_F6AF7F0342224EF28B65ABC2C382FFB1

From Cisco Forum:

Second-level devices are only available for Cisco UCS M3 blade and rack servers using enhanced boot order. ForCisco UCS M1 and M2 blade and rack servers using standard boot order, you can choose only the top-level Add Local Disk.

If you select 'Add Local CD/DVD' or 'Add Remote CD/DVD' the service profile will fail to apply to a non-M3 blade, those options are uefi 2nd level boot.  You must delete any CD/DVD from the service profile, then add the top level Add CD/DVD when Legacy Boot is checked.
CSCun10760 was opened so that second order boot options are greyed out when using legacy boot.

Wednesday, April 16, 2014

Vmware KB 2035510 "Cannot complete login due to an incorrect username or password"


Logging into vCenter Server 5.1 or 5.5 using the vSphere Client with an Active Directory domain account and selecting the Use Windows session credentials checkbox, fails with the error:

Cannot complete login due to an incorrect username or password

Cause:
Active Directory Identity Sources must be added to the Single Sign On (SSO) configuration with the domain NETBIOS (short name) as the Domain Alias. If a Domain Alias is not configured with the domain short name, authentication using session credentials may fail.

Resolution:

To resolve this issue, remove the existing Active Directory Identity Source, and recreate it with a Domain Alias.
To remove the existing Active Directory Identity Source, and recreate it with a Domain Alias:
  1. Log into the vSphere Web Client using the Admin@System-Domain (for 5.1) or administrator@vsphere.local credentials (for 5.5).
  2. Click Administration.
  3. Under Sign-On and Discovery, click Configuration.
  4. Click the Active Directory identity source.
  5. Under Actions, click Edit Identity Source.
  6. Make note of the information in the identity source.
  7. Click Cancel.
  8. Under Actions, click Delete Identity Source.
  9. Recreate the identity source using the short NETBIOS name in the Domain Alias field.
  10. Click Test Connection.
  11. Click OK.

Ref:
http://kb.vmware.com/selfservice/microsites/search.do?language=en_US&cmd=displayKC&externalId=2035510

Tuesday, April 1, 2014

BugId CSCul20788 UCS Firmware issue

The background:

When installing a new B200 M3 server, it will either fail discovery at 56% or service profile association at 39% with the below:
service profile association at 39%
 Slot Status: Equipped
 Equipped Conn Path: A,B
 Equipped Conn Status: A,B
 Equipped Managing Instance: B
 Availability: Unavailable
 Admin State: In Service
 Overall Status: Config Failure
 Oper Qualifier: N/A
 Discovery: Complete
 Current Task: Waiting for BIOS POST completion from CIMC on server 1/4(FSM-STAGE:sam:dme:ComputePhysicalAssociate:BiosPostCompletion)
 Check Point: Discovered


Conditions:
B200 M3 with E5-2600 V2 series CPU which begins support in UCS 2.1.3a.
UCS infrastructure running 2.1.3a


For service profile association failing at 39%
CIMC==2.1.3a
Bios==2.1.1a
For Discovery failing at 56%L
CIMC==2.1.1e
BIOS==2.1.1a
Workaround:
Correct firmware version for blade to supported version for all components.


Ref:
BugId CSCul20788

UCS Firmware Upgrade: 2.1

http://www.techshifter.com/2013/02/12/ucs-firmware-upgrade-2-1/

Tuesday, March 25, 2014

EMC Networker Note


In the  NetWorker-VMware-7.6-Service-Pack-2-Integration-Guide:

The software and hardware requirements for VADP include:
◆ One or more VADP proxy systems running any of the following operating
systems (English versions only):
• Windows Server 2003 SP1 (32-bit or 64-bit)
• Windows Server 2003 R2 (32-bit or 64-bit)
• Windows Server 2003 SP2 (32-bit or 64-bit)
• Windows 2008 (32-bit or 64-bit)
• Windows 2008 R2


The VADP FLR option has not been qualified with dynamic disks and is not supported by Networker. Here are some of the limitations that are not supported by the Networker FLR option:

  • Virtual Machine OS containing GPT or dynamic disks. 
  • Virtual Machine OS containing uninitialized disks. 
  • Virtual Machine OS containing unformatted partitions 
  • Virtual Machine OS containing partitions without drive letters. 
  • Virtual Machine configuration with Virtual IDE Disk Devices (only SCSI). 
  • Virtual Machine configuration with independant disk mode.


https://community.emc.com/thread/149443?tstart=0

Using vSphere Changed Block Tracking CBT with EMC Networker Backup

Tuesday, March 18, 2014

how to copy tech-support log with Putty


  1. In Putty Configurations > Session >Logging 
  2. Select "All Session output"
  3. Select "Flush log file frequently" will overwrite the log file every time when start the session  
  4. connect the device 
  5. in the EXEC mode of the command prompt, type terminal length 0 which will make the command output at once without interrupt
vsg1#terminal length 0 
vsg1#show tech-support all 

     6.then we will have the output in the Putty log file ^ ^
Ref:
http://ccienet.wordpress.com/2012/01/22/how-to-copy-large-show-tech-support-from-cisco-device-using-putty/

Monday, March 17, 2014

Create persistent scratch location on ESXi host using a VMware vSphere client for using USB boot Esxi

VMware recommends that ESXi has a persistent scratch location available for storing temporary data including logs, diagnostic information, and system swap. (This is not a requirement, however.) Persistent scratch space may be provisioned on a FAT 16, VMFS, or NFS partition accessible by the ESXi host.
http://kb.vmware.com/selfservice/microsites/search.do?language=en_US&cmd=displayKC&externalId=1033696

Using a VMware vSphere client
http://www-01.ibm.com/support/docview.wss?uid=isg3T1013015

Configuring syslog on ESXi 5.x (2003322)

VMware vSphere ESXi 5.x hosts run a syslog service (vmsyslogd) that provides a standard mechanism for logging messages from the VMkernel and other system components. By default in ESXi, these logs are placed on a local scratch volume or a ramdisk. To preserve the logs further, ESXi can be configured to place these logs to an alternate storage location on disk, and to send the logs across the network to a syslog server.

Thursday, March 13, 2014

Using Power CLI/vim-cmd to upgrade VM version of virtual machine

vim-cmd vmsvc/getallvms
vim-cmd vmsvc/upgradM-ID] vmx-[e [VHW-VERSION]

PowerCLI:
$vm=Get-VM -Name VM-NAME
$vm.Version

Set-Vm -VM (Get-VM -Name [VM-NAME]) -Version v[HW-VERSION]

Ref:
http://www.virtuallyghetto.com/2013/10/quick-tip-using-cli-to-upgrade-to.html

Thursday, March 6, 2014

vCenter vpxd.cfg Advanced Configuration

The post about details in vpxd.cfg


The vpxd.cfg file is located on the VMware vCenter Server by default at %ALLUSERPROFILE%\Application Data\VMware\VMware VirtualCenter\vpxd.cfg

On Windows Server 2008, 
C:\ProgramData\VMware\VMware VirtualCenter\vpxd.cfg
On Windows Server 2003,
C:\Documents and Settings\All Users\Application Data\VMware\VMware VirtualCenter\vpxd.cfg


http://www.boche.net/blog/index.php/2010/03/13/vpxd-cfg-advanced-configuration/

Wednesday, March 5, 2014

Implementing VMware vSphere 5 Auto Deploy on the Cisco Unified Computing System


This document provides an overview and detailed procedure for installing and configuring the VMware vSphere 5 Auto Deploy feature on a Microsoft Windows server. VMware vSphere is an industry-leading virtualization platform, transforming data centers into dramatically simplified cloud infrastructures and enabling the next generation of flexible, reliable IT services. Cisco Unified Computing System ™ (Cisco UCS ™) and VMware vSphere together enable rapid application and infrastructure deployment with greater security, availability, and performance leading to increased return on investment (ROI) and reduced total cost of ownership (TCO) for computing environments.


http://www.cisco.com/c/en/us/solutions/collateral/data-center-virtualization/unified-computing/whitepaper_c11-701953.html

vCenter Server and ESXi/ESX host build numbers to update levels

get ESX build # command

  • uname -a 
  • esxcli system version get


http://kb.vmware.com/selfservice/microsites/search.do?language=en_US&cmd=displayKC&externalId=1014508

VMware vCenter Server performance and database troubleshooting

The following links provide detailed steps for vCenter server performance troubleshooting:

  • vCenter Server does not start.
  • vCenter Server is slow to respond.
  • vCenter Server fails after an indefinite amount of time.
  • When connected to a Microsoft SQL database, the vCenter Server vpxd.log contains an entry similar to:

    ODBC error: (42000) - [Microsoft][SQL Native Client][SQL Server]Could not allocate space for object <object> in database '<database>' because the '<filegroup>' filegroup is full. Create disk space by deleting unneeded files, dropping objects in the filegroup, adding additional files to the filegroup, or setting autogrowth on for existing files in the filegroup." is returned when executing SQL statement "<sql statement>".
  • When connected to an Oracle database, the vCenter Server vpxd.log contains an entry similar to:
    ODBC error: (HY000) - [Oracle][ODBC][Ora]ORA-01653: unable to extend table <table> by <size> in tablespace <tablespace> is returned when executing SQL statement <SQL Statement>.
  • You see this error when attempting to connect to the SQL database server:
    ODBC error: (08S01) - [Microsoft][SQL Native Client]Named Pipes Provider: No process is on the other end of the pipe.
  • The VirtualCenter Server service cannot authenticate with the database.
  • You cannot connect to the database repository through SQL Server or Oracle.
  • The vCenter Server database is corrupt.
Note: The vpxd.log files are located in %ALLUSERSPROFILE%\Application Data\VMware\VMware VirtualCenter\Logs.
http://kb.vmware.com/selfservice/microsites/search.do?language=en_US&cmd=displayKC&externalId=1003979#growth
http://kb.vmware.com/selfservice/microsites/search.do?language=en_US&cmd=displayKC&externalId=1003979#slowdb

  • High disk usage of the VMware vCenter Server database
  • High disk usage of the VMware vCenter Server database transactional logs
Note: If you are using Microsoft SQL, there is a way to validate where space is being consumed within a Microsoft SQL database.
http://kb.vmware.com/selfservice/microsites/search.do?cmd=displayKC&docType=kc&docTypeID=DT_KB_1_1&externalId=1028356

For troubleshooting or maintenance purposes it may be necessary to defragment the indexes on your Microsoft SQL database server. This article provides the steps perform a defragmentation of the indexes to increase performance of the database.

Due to the database schema enhancements made in vSphere 5.1.x and later versions, defragmentation of the vCenter Server database is no longer required.

SQL Server Integrity Check tools CHECKDB

Checks the logical and physical integrity of all the objects in the specified database by performing the following operations:

  • Runs DBCC CHECKALLOC on the database.
  • Runs DBCC CHECKTABLE on every table and view in the database.
  • Runs DBCC CHECKCATALOG on the database.
  • Validates the contents of every indexed view in the database.
  • Validates link-level consistency between table metadata and file system directories and files when storing varbinary(max) data in the file system using FILESTREAM.
  • Validates the Service Broker data in the database.
Syntax
DBCC CHECKDB 
[
    [ ( database_name | database_id | 0
        [ , NOINDEX 
        | , { REPAIR_ALLOW_DATA_LOSS | REPAIR_FAST | REPAIR_REBUILD } ]
    ) ]
    [ WITH 
        {
            [ ALL_ERRORMSGS ]
            [ , EXTENDED_LOGICAL_CHECKS ] 
            [ , NO_INFOMSGS ]
            [ , TABLOCK ]
            [ , ESTIMATEONLY ]
            [ , { PHYSICAL_ONLY | DATA_PURITY } ]
        }
    ]
]


Ref:
http://technet.microsoft.com/en-us/library/ms176064.aspx

SQL Server Integrity Check – A Necessary Routine

http://www.pythian.com/blog/sql-server-integrity-check-a-necessary-routine/

vCenter Performance Overview Tab fails to display


There are several possible causes for this issue.check the following step by step:
  1. Confirm that the vCenter Web Management Service is running.
  2. To resolve this issue, connect to vCenter locally with a vSphere Client located on the vCenter Server and follow Stopping, starting, or restarting vCenter services.
  3. Ensure that the correct DNS settings and IP address are being used
  4. Disable any third party web services that may be interfering with the vCenter Web Management Services.(port 8443)
  5. Check if vCenter Server is using custom SSL certificates as a result of a recent upgrade to vCenter Server 4.0 Update 1. 
  6. Disable the proxy settings from the browser. 


Ref: http://kb.vmware.com/selfservice/microsites/search.do?language=en_US&cmd=displayKC&externalId=1014454

Tuesday, March 4, 2014

Error on SQL Server 2005: "Create maintenance plan failed"

The cause of this error is lack of  Integration Services (SSIS) service when installing SQL server 2005.

When you create the maintenance plan, the following code is run.
EXEC msdb.dbo.sp_update_jobstep @job_name=N'System DB Maintenance Plan', @step_id=1 , @subsystem=N'SSIS', @command=N'/SQL 
"\Maintenance Plans\System DB Maintenance Plan" /SERVER ASHBSQL701 /MAXCONCURRENT " -1 " /CHECKPOINTING OFF'
This code tries to access the Integration Services service.
The solution is to install back the Integration Services from the SQL server 2005 setup CD


Ref: http://support.microsoft.com/kb/909036

Thursday, January 23, 2014

IBM x86 technote for SAS storage

IBM ServeRAID Adapter Quick Reference

http://www.redbooks.ibm.com/abstracts/tips0054.html#m5110

 ServeRAID M5210 and M5210e SAS/SATA Controllers
The ServeRAID M5210 and M5210e SAS/SATA controllers for IBM System x are part of the IBM ServeRAID M Series family that offers a complete server storage solution consisting of RAID controllers, cache/flash modules, energy packs, and software feature upgrades in an ultra-flexible offerings structure. These products are optimized to deliver the performance that is demanded by the ever-growing I/O requirements of today's enterprises. M5210 comes as a small form factor PCIe adapter, and M5210e comes integrated with the IBM System x3650 M4 HD server. They also share a common set of upgrades, simplifying inventory management.
ServeRAID M5210 SAS/SATA Controller (with an optional cache installed)
IBM 6 Gb SAS Host Bus Adapter for System x


http://www.redbooks.ibm.com/abstracts/tips0776.html

The PCIe small form-factor IBM 6 Gb SAS HBA is based on the LSI SAS2008 controller and can handle medium to large capacity server storage applications by connecting an 8-lane PCI Express adapter with one external x4 SFF-8088 connector and four internal SATA connectors.
6 Gbps SAS 2.0 technology has been introduced to address data off-load bottlenecks in the direct-access storage environment. This new throughput doubles the transfer rate of the previous generation. SAS 2.0 is designed for backward compatibility with 3 Gbps SAS as well as with 3 Gbps SATA hard drives and tape drives.

One external x4 SFF-8088 connector


Thursday, January 9, 2014

VMware KB - vSphere Client and vSphere PowerCLI may fail to connect to vCenter Server 5.5 due to a Handshake failure (2049143)

Error:
"This results in the error No matching cipher suite on the server side, and a Handshake failure on the vSphere Client or vSphere PowerCLI side"

Background:
When installed on a Windows XP or Windows Server 2003 host machine, the vSphere Client and vSphere PowerCLI may fail to connect to vCenter Server 5.5 due to a Handshake failure. vSphere 5.5 uses the Open SSL library, which, for security, is configured by default to accept only connections that use strong cipher suites. On Windows XP or Windows Server 2003, the vSphere Client and vSphere PowerCLI do not use strong cipher suites to connect with vCenter Server. 


  • The solution is to allow weaker cipher in Vcenter5.5 and Esxi 5.5 Host
  • Add the <cipherList>ALL</cipherList> parameter between the <ssl>...</ssl> section of the configuration file
  • Please make sure you have a backup copy of the config file before edit
  • For Windows-based vCenter Server
    C:\ProgramData\VMware\VMware VirtualCenter\vpxd.cfg

    For the vCenter Server Appliance
    /etc/vmware-vpx/vpxd.cfg

    For ESXi 5.5
    /etc/vmware/rhttpproxy/config.xml
     
     
http://kb.vmware.com/selfservice/microsites/search.do?cmd=displayKC&docType=kc&externalId=2049143&sliceId=1&docTypeID=DT_KB_1_1&dialogID=47844467&stateId=1%200%2047848621

Wednesday, January 8, 2014

Veeam Backup & Replication 7.0 feature

Veeam Backup & Replication 7.0


Inline data deduplication
Veeam Backup & Replication deduplicates identical blocks of data when backing up multiple VMs in one job, and eliminates empty space on logical disks of VMs. Use of deduplication dramatically reduces storage costs: you can reduce the backup size up to 90% when backing up VMs created from the same template
Use changed block tracking data check box is selected. For VMware VMs with hardware version 7 or later, Veeam Backup & Replication employs VMware vSphere Changed Block Tracking (CBT). Instead of scanning VMFS to know which data blocks have changed since the previous job run, Veeam Backup & Replication queries the CBT module to get the list of changed blocks. Use of CBT increases the speed and efficiency of block-level incremental backups. For example, if only 5% of a VM changed since the last backup, incremental backup will be performed 20 times faster.


There are some facts about CBT:
  • The CBT mechanism is implemented as a file system filter driver.
  • Information on data blocks that have changed is registered in special .ctp files 
  • .ctp files are stored in the C:\ProgramData\Veeam\CtpStore folder on standalone Hyper-V hosts or on every node of the Hyper-V cluster.
  • notes.txt file. This file contains basic information about the VM such as VM name and ID, and describes for which .vhd files changed block tracking is enabled.
  • The backup window of incremental jobs may increase dramatically when CBT is disabled ,as Veeam Backup & Replication will read all of VM data to detect what blocks have changed since the last job run.
cbt
http://helpcenter.veeam.com/backup/70/hyperv/changed_block_tracking.html

Exclude swap file blocks from processing check box is selected.
Swap files are dynamic and change intensively between runs of a backup job. With this option selected, Veeam Backup & Replication will identify data blocks of the Windows pagefile in the guest OS and exclude them from processing, which will result in increased performance and a smaller size of increments.
Application-aware image processing, which will ensure proper restore of VSS-aware applications. To back up running VMs with VSS-aware applications (such as Active Directory, Microsoft SQL, Microsoft Exchange, Sharepoint), Veeam Backup & Replication uses application-aware image processing based on Microsoft VSS. Jobs with application-aware image processing produce transactionally consistent backups, which, unlike crash consistent backups, guarantee proper recovery of virtualized applications without any data loss.
• Guest OS file indexing, which will enable you to search for guest OS files in backed up VMs and restore files in 1 click. With this option selected, Veeam Backup & Replication creates a catalog (or index) of VM guest OS files. To learn about the 1-click restore

Make sure that the Truncate logs on successful backup only option is selected to correctly handle transaction logs after the backup job is completed. In this case, if the backup job finishes successfully, Veeam Backup & Replication will truncate transaction logs so that they do not overflow storage space. If you use an additional third-party backup tool that maintains consistency of transaction logs, select the Do not truncate logs option to prevent possible conflicts.

On the Indexing tab, select the Index everything option to perform indexing of the
Monitor job performance in real time
Recovery
Instant VM Recovery*, which uses the vPower technology to start a VM directly from a compressed and deduplicated backup file. Instant VM Recovery creates a "temporary spare" of the original VM and provides the minimum restore time possible (several seconds to several minutes).

Performing Item-Level Restore
Select the mailbox from which you want to restore Microsoft Exchange items (e-mails, contacts, appointments and so on).
In the Mailbox account field, specify the account of the user whose mailbox you want to access. To quickly find the necessary account, enter the first characters of the account in the field and click Checkon the right or press [ENTER] on the keyboard. The Microsoft Exchange Recovery wizard will form a list of available accounts starting with entered characters so that you can choose the necessary one.
The information about the server hosting the selected mailbox will be displayed in the lower part of the window.
If prompted, specify the credentials to be used to access the specified mailbox in production environment.


NOTE:
This account should have sufficient access rights for the specified mailbox, 
otherwise you will not be able to proceed. If necessary, contact your 
Exchange administrator.
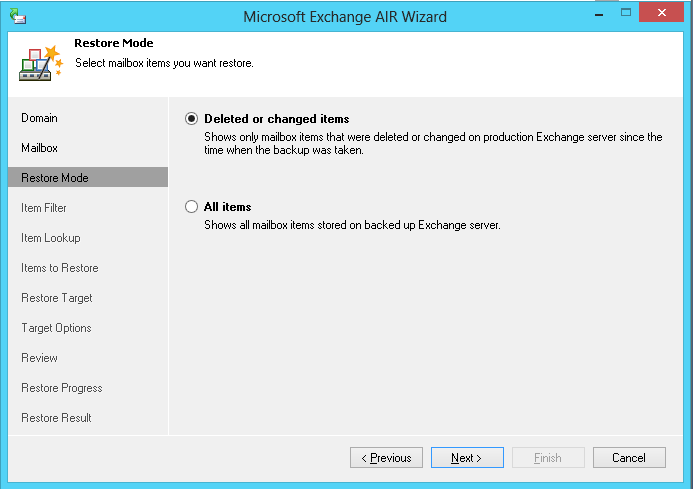
Select the mode in which you want to restore items from the selected mailbox. You can choose to work only with those items that have changed since the point you selected, or work with all items in this mailbox.
At the Item Filter step of the wizard, you can specify filter criteria that will help you find the necessary item. Use the Add Criteria list at the bottom of the window to add any item fields you need. Fill in the fields so that the Microsoft Exchange Recovery wizard can apply the filter.
After you provide the search filter, the Microsoft Exchange Recovery wizard will look for the necessary items and display the list of those that match the specified criteria. Select check boxes next to the items you want to restore. You can use the Mailbox item type field at the top to display items of the necessary type only.
Specify to which location you want to restore the selected item(s). You can restore items back to the original mailbox on the production Microsoft Exchange server or save them as individual files to the selected folder.
NOTE:

Microsoft Exchange Recovery wizard does not allow you to save items restored

from Microsoft Exchange 2010 to a file. For this reason, 
the File system option is disabled for Microsoft Exchange 2010


Specify options for the mailbox or folder to which you want to restore Microsoft Exchange items.
●If you have selected to restore items to a mailbox, select the mailbox folder to which restored items should be placed. You can additionally select to mark restored items as Unread. If you are restoring multiple mailbox items, you can select the Preserve folder hierarchy check box to keep the initial folder structure.
●If you have selected to restore items to a folder, specify the path to the folder to which restored items should be placed.
Review the settings you specified and click Restore. The selected items will be restored to the specified mailbox/folder in the production Microsoft Exchange server or saved as individual files to the selected folder.

Other key enhancements include:
Virtual Lab functionality, including Sure Backup, is now available for Microsoft Hyper-V. This allows item level restores in SQL, Exchange and Active Directory using Veeam U-AIR wizards which have also been updated in v7 making restores easier and quicker.
The ability to take backups from storage snapshots provides huge performance improvements, additional storage system support has been added into B&R v7 which now includes HP 3PAR/StoreServ and HP StoreVirtual VSA.
Veeam Explorer has been updated, adding-in support for Microsoft Sharepoint 2010 and Microsoft Exchange 2013, as well as now allowing restores to Office 365 and improving overall restore performance into existing Exchange environments.
Performance improvements offered across both VMware and Hyper-V environments include:

Change Block Tracking optimisations and improved speed for file level recovery operations. Specific to VMware it is now possible to transparently backup vCenter without the need to specify which host it is running on and snapshots can be committed concurrently. With Hyper-V there is now extended support available for ODX enabled storage and clustered disks along with performance improvements for load balancing.
Insight into Guest OS Recovery

Together with full VM recovery, Veeam Backup & Replication offers Instant File-Level Restore (IFLR) which lets you recover guest OS files and folders from the VM backup. In contrast to competitive solutions, IFLR does not require a specific file-level backup –restore of guest OS files, as well as all other restore options, are available from the same image-level backup. Neither should you extract the VM image from the backup prior to restore – VM guest OS files can be recovered on-the-fly, directly from a regular backup (or from a VM replica). This makes the restore process extremely fast and does not require you to provision additional storage resources.
Veeam Backup & Replication provides three options for guest OS files recovery:
• Recovery from Windows-based file systems (FAT, NTFS and ReFS)
• Recovery from 15 most used file systems (including Linux, Unix, BSD and soon) with the multi-OS restore wizard
• Universal File-Level Recovery*for any OS or file system through leveraging the Instant VM Recovery technology*

VM guest OS files can be recovered to the latest state or any good to know point in time.


Monday, January 6, 2014

Netapp note

1. Firmware upgrade:
  • NetApp supports non-disruptive upgrade (NDU) for both major and minor version upgrade for SAN (FCP and iSCSI) and NFS environment. NDU is not supported for CIFS due to the protocol behavior so please make sure the customer knows it before doing the upgrade (if CIFS is using)
  • take over cause about 15 seconds interrupt 
  • use upgrade adviser 
  •      ONTAP version is 8.0.2P3 7-Mode which does NOT support 1.2TB 10K SAS disks that comes with DS2246. A firmware upgrade to 8.1.2+ would be required. collateral device firmware and software (e.g. SnapManager) also need to be upgraded for supportability. End-user can make use of their NOW account to check for upgrade readiness and steps for their registered FAS3240 system.  
          DS2246 (IOM6) can technically be added to the same stack with existing DS4243 (IOM3) disk shelf but it is NOT recommended due to difference in speed (3G and 6G). Additional 6G SAS adapter is required for dedicated 6G stack.


2. Capacity 


A pair of SAS adpator to 5 disk shelf max.


IOM6 will not be bottle for SSD disk array in stead of IOM3

NetApp Releases Storage Best Practices for VMware vSphere 5


ref: 


Presenting a LUN over Fibre Channel from a NetApp FAS 3240 Array to an ESXi 5.0 Host Running on a Cisco UCS B200 Blade

http://virtuallyhyper.com/2012/11/presenting-a-lun-from-a-netapp-fas-3240-arrya-to-an-esxi-5-0-host-running-on-a-cisco-ucs-b200-blade/


How to change the Data ONTAP 8.x simulator serial number

Data ONTAP 8 :


    First halt the VSIM and enter into the bootloader prompt. Set the new  serial ID there as shown.

     SIMLOADER> set SYS_SERIAL_NUM="987654-32-1"
     SIMLOADER> boot

   On booting if the system complains that it can't find it's disks then that's because software disk ownership is doing the right thing and keeping the disks allocated to the older system (old serial number). If so, ctrl-c into 
   maintenance mode and re-assign the disks to the new ID.


Netapp Data Ontap 7-Mode CLI Pocket Guide