Showing posts with label vmware. Show all posts
Showing posts with label vmware. Show all posts
Monday, October 6, 2014

Thursday, September 11, 2014
VMware NSX Manager 6.0.5 install


Monday, July 28, 2014
SW ,HW,OS Compatibility note
I am trying to gather links and resource in terms of checking Compatibility when design, deploy or upgrade...
The VMware Compatibility Guide shows the certification status of operating system releases for use as a Guest OS by the following VMware products:
• VMware ESXi/ESX Server 3.0 and later
• VMware Workstation 6.0 and later
• VMware Fusion 2.0 and later
• VMware ACE 2.0 and later
• VMware Server 2.0 and later
http://partnerweb.vmware.com/comp_guide2/pdf/VMware_GOS_Compatibility_Guide.pdf
VMware Compatibility Guide Portal:
VMware provides support only for the devices that are listed in this document
http://www.vmware.com/resources/compatibility/search.php
http://kb.vmware.com/selfservice/microsites/search.do?language=en_US&cmd=displayKC&externalId=1014508
Enhanced vMotion Compatibility (EVC) processor support (1003212)
For hosts in cluster with different version of CPU
http://kb.vmware.com/selfservice/microsites/search.do?language=en_US&cmd=displayKC&externalId=1003212
IBM servers OS support
http://www-03.ibm.com/systems/info/x86servers/serverproven/compat/us/nos/vmware.html
The VMware Compatibility Guide shows the certification status of operating system releases for use as a Guest OS by the following VMware products:
• VMware ESXi/ESX Server 3.0 and later
• VMware Workstation 6.0 and later
• VMware Fusion 2.0 and later
• VMware ACE 2.0 and later
• VMware Server 2.0 and later
http://partnerweb.vmware.com/comp_guide2/pdf/VMware_GOS_Compatibility_Guide.pdf
VMware Compatibility Guide Portal:
VMware provides support only for the devices that are listed in this document
http://www.vmware.com/resources/compatibility/search.php
Correlating VMware products build numbers to update levels (1014508)
VMware vSphere and vCloud suite build numbers table
This table provides a list of all VMware vSphere and vCloud suite build numbers and release dates. The build numbers are based on full installations. Patching ESXi/ESX hosts increments the build number that shows in vCenter Server.Enhanced vMotion Compatibility (EVC) processor support (1003212)
For hosts in cluster with different version of CPU
http://kb.vmware.com/selfservice/microsites/search.do?language=en_US&cmd=displayKC&externalId=1003212
IBM servers OS support
http://www-03.ibm.com/systems/info/x86servers/serverproven/compat/us/nos/vmware.html
Monday, May 26, 2014
KB Datastore renaming fails when the Virtual Infrastructure Client is connected directly to ESX host (1004845)
Datastore renaming fails when the Virtual Infrastructure Client is connected directly to ESX host (1004845)
Request a Product Feature
To request a new product feature or to provide feedback on a VMware product, please visit the Request a Product Feature page.
Tuesday, May 20, 2014
Vmware KB Testing VMkernel network connectivity with the vmkping command (1003728)
Testing VMkernel network connectivity with the vmkping command (1003728)
Vmware Cluster datastore path dead
Symptoms:
Search through esxi logs and get result below:
standard input)-2014-05-xxT03:09:31.297Z cpu6:8198)WARNING: NMP: nmp_DeviceRequestFastDeviceProbe:237:NMP device "naa.60a9800037536d72502444xxxxxxxxb" state in doubt; requested fast path state update...
(standard input)-2014-05-xxT03:09:31.594Z cpu4:8401)ALERT: NMP: vmk_NmpVerifyPathUID:1167:The physical media represented by device naa.60a9800037536d72502444xxxxxx (path vmhba32:C0:T0:L13) has changed. If this is a data LUN, this is a critical error. Detect
(standard input)-2014-05-xxT03:09:31.594Z cpu4:8401)WARNING: ScsiDevice: 1422: Device :naa.60a9800037536d72502444xxxxxxx has been removed or is permanently inaccessible.
(standard input):2014-05-xxT03:09:32.410Z cpu4:8196)WARNING: HBX: 1548: HB failed due to no connectivity on [HB state abcdef02 offset 4059136 gen 17 stampUS 1847607014728 uuid 535950b3-29e2ce5d-488a-0025b501011f jrnl <FB 70200> drv 14.58] on vol 'XXXXXXX'
(standard input)-2014-05-xxT03:10:50.461Z cpu10:8202)WARNING: NMP: nmp_DeviceRequestFastDeviceProbe:237:NMP device "naa.60a9800037536d72502xxxxxxxx" state in doubt; requested fast path state update...
(standard input)-2014-05-xxT03:16:42.380Z cpu15:10515)WARNING: Vol3: 1717: Failed to refresh FS 535daf66-4b90cce6-fa7c-0025b50100ee descriptor: Device is permanently unavailable
(standard input)-2014-05-xxT03:16:42.661Z cpu15:10515)WARNING: Vol3: 1717: Failed to refresh FS 535daf66-4b90cce6-fa7c-0025b50100ee descriptor: Device is permanently unavailable
not sure whether this KB describe the exact issue but at least they got similar symptoms
Unmounting a LUN or detaching a datastore/storage device from multiple VMware ESXi 5.x hosts (2004605)
This article provides steps to unmount a LUN from an ESXi 5.x host, which includes unmounting the file system and detaching the device. These steps must be performed for each ESXi host.
http://kb.vmware.com/selfservice/microsites/search.do?language=en_US&cmd=displayKC&externalId=2004605
- have 4 esxi5.1 hosts (esxi01-04) in vmware cluster, VM in two specific datastore cannot start up on esxi01 host
- checked the iSCSI Network adapter should be fine as only two datastore have issue
- checked the LUN mapping is fine
- Try rescan and refresh datatstore didn't solve the issue
- Try to disconnect and re-mount the datastore on esxi01 didn't solve the problem .
- For a reason to resume service asap, migrate all VMs to TEMP datastore, unmount and detach the datastore for all esxi host
- unmaping LUN on storage side, rescan datastore on vmware cluster the problem LUN should be disappear.
- Remap LUN to esxi hosts, add to datasore cluster again, re-signature and format the LUN, put VM on it for testing
Search through esxi logs and get result below:
standard input)-2014-05-xxT03:09:31.297Z cpu6:8198)WARNING: NMP: nmp_DeviceRequestFastDeviceProbe:237:NMP device "naa.60a9800037536d72502444xxxxxxxxb" state in doubt; requested fast path state update...
(standard input)-2014-05-xxT03:09:31.594Z cpu4:8401)ALERT: NMP: vmk_NmpVerifyPathUID:1167:The physical media represented by device naa.60a9800037536d72502444xxxxxx (path vmhba32:C0:T0:L13) has changed. If this is a data LUN, this is a critical error. Detect
(standard input)-2014-05-xxT03:09:31.594Z cpu4:8401)WARNING: ScsiDevice: 1422: Device :naa.60a9800037536d72502444xxxxxxx has been removed or is permanently inaccessible.
(standard input):2014-05-xxT03:09:32.410Z cpu4:8196)WARNING: HBX: 1548: HB failed due to no connectivity on [HB state abcdef02 offset 4059136 gen 17 stampUS 1847607014728 uuid 535950b3-29e2ce5d-488a-0025b501011f jrnl <FB 70200> drv 14.58] on vol 'XXXXXXX'
(standard input)-2014-05-xxT03:10:50.461Z cpu10:8202)WARNING: NMP: nmp_DeviceRequestFastDeviceProbe:237:NMP device "naa.60a9800037536d72502xxxxxxxx" state in doubt; requested fast path state update...
(standard input)-2014-05-xxT03:16:42.380Z cpu15:10515)WARNING: Vol3: 1717: Failed to refresh FS 535daf66-4b90cce6-fa7c-0025b50100ee descriptor: Device is permanently unavailable
(standard input)-2014-05-xxT03:16:42.661Z cpu15:10515)WARNING: Vol3: 1717: Failed to refresh FS 535daf66-4b90cce6-fa7c-0025b50100ee descriptor: Device is permanently unavailable
not sure whether this KB describe the exact issue but at least they got similar symptoms
VMFS Resignature causes thrashing between multiple VMware ESXi 4.x/5.x and ESX 4.x hosts (1026710
http://kb.vmware.com/selfservice/microsites/search.do?language=en_US&cmd=displayKC&externalId=1026710Unmounting a LUN or detaching a datastore/storage device from multiple VMware ESXi 5.x hosts (2004605)
This article provides steps to unmount a LUN from an ESXi 5.x host, which includes unmounting the file system and detaching the device. These steps must be performed for each ESXi host.
http://kb.vmware.com/selfservice/microsites/search.do?language=en_US&cmd=displayKC&externalId=2004605
Thursday, March 13, 2014
Using Power CLI/vim-cmd to upgrade VM version of virtual machine
vim-cmd vmsvc/getallvms
vim-cmd vmsvc/upgradM-ID] vmx-[e [VHW-VERSION]
PowerCLI:
$vm=Get-VM -Name VM-NAME
$vm.Version
Set-Vm -VM (Get-VM -Name [VM-NAME]) -Version v[HW-VERSION]
Ref:
http://www.virtuallyghetto.com/2013/10/quick-tip-using-cli-to-upgrade-to.html
vim-cmd vmsvc/upgradM-ID] vmx-[e [VHW-VERSION]
PowerCLI:
$vm=Get-VM -Name VM-NAME
$vm.Version
Set-Vm -VM (Get-VM -Name [VM-NAME]) -Version v[HW-VERSION]
Ref:
http://www.virtuallyghetto.com/2013/10/quick-tip-using-cli-to-upgrade-to.html
Wednesday, March 5, 2014
Implementing VMware vSphere 5 Auto Deploy on the Cisco Unified Computing System
This document provides an overview and detailed procedure for installing and configuring the VMware vSphere 5 Auto Deploy feature on a Microsoft Windows server. VMware vSphere is an industry-leading virtualization platform, transforming data centers into dramatically simplified cloud infrastructures and enabling the next generation of flexible, reliable IT services. Cisco Unified Computing System ™ (Cisco UCS ™) and VMware vSphere together enable rapid application and infrastructure deployment with greater security, availability, and performance leading to increased return on investment (ROI) and reduced total cost of ownership (TCO) for computing environments.
http://www.cisco.com/c/en/us/solutions/collateral/data-center-virtualization/unified-computing/whitepaper_c11-701953.html
vCenter Server and ESXi/ESX host build numbers to update levels
get ESX build # command
http://kb.vmware.com/selfservice/microsites/search.do?language=en_US&cmd=displayKC&externalId=1014508
- uname -a
- esxcli system version get
http://kb.vmware.com/selfservice/microsites/search.do?language=en_US&cmd=displayKC&externalId=1014508
VMware vCenter Server performance and database troubleshooting
The following links provide detailed steps for vCenter server performance troubleshooting:
http://kb.vmware.com/selfservice/microsites/search.do?language=en_US&cmd=displayKC&externalId=1003979#growth
http://kb.vmware.com/selfservice/microsites/search.do?language=en_US&cmd=displayKC&externalId=1003979#slowdb
http://kb.vmware.com/selfservice/microsites/search.do?cmd=displayKC&docType=kc&docTypeID=DT_KB_1_1&externalId=1028356
For troubleshooting or maintenance purposes it may be necessary to defragment the indexes on your Microsoft SQL database server. This article provides the steps perform a defragmentation of the indexes to increase performance of the database.
- vCenter Server does not start.
- vCenter Server is slow to respond.
- vCenter Server fails after an indefinite amount of time.
- When connected to a Microsoft SQL database, the vCenter Server vpxd.log contains an entry similar to:
ODBC error: (42000) - [Microsoft][SQL Native Client][SQL Server]Could not allocate space for object <object> in database '<database>' because the '<filegroup>' filegroup is full. Create disk space by deleting unneeded files, dropping objects in the filegroup, adding additional files to the filegroup, or setting autogrowth on for existing files in the filegroup." is returned when executing SQL statement "<sql statement>". - When connected to an Oracle database, the vCenter Server vpxd.log contains an entry similar to:
ODBC error: (HY000) - [Oracle][ODBC][Ora]ORA-01653: unable to extend table <table> by <size> in tablespace <tablespace> is returned when executing SQL statement <SQL Statement>. - You see this error when attempting to connect to the SQL database server:
ODBC error: (08S01) - [Microsoft][SQL Native Client]Named Pipes Provider: No process is on the other end of the pipe. - The VirtualCenter Server service cannot authenticate with the database.
- You cannot connect to the database repository through SQL Server or Oracle.
- The vCenter Server database is corrupt.
http://kb.vmware.com/selfservice/microsites/search.do?language=en_US&cmd=displayKC&externalId=1003979#growth
http://kb.vmware.com/selfservice/microsites/search.do?language=en_US&cmd=displayKC&externalId=1003979#slowdb
- High disk usage of the VMware vCenter Server database
- High disk usage of the VMware vCenter Server database transactional logs
http://kb.vmware.com/selfservice/microsites/search.do?cmd=displayKC&docType=kc&docTypeID=DT_KB_1_1&externalId=1028356
For troubleshooting or maintenance purposes it may be necessary to defragment the indexes on your Microsoft SQL database server. This article provides the steps perform a defragmentation of the indexes to increase performance of the database.
Due to the database schema enhancements made in vSphere 5.1.x and later versions, defragmentation of the vCenter Server database is no longer required.
Thursday, January 9, 2014
VMware KB - vSphere Client and vSphere PowerCLI may fail to connect to vCenter Server 5.5 due to a Handshake failure (2049143)
Error:
"This results in the error No matching cipher suite on the server side, and a Handshake failure on the vSphere Client or vSphere PowerCLI side"
Background:
When installed on a Windows XP or Windows Server 2003 host machine, the vSphere Client and vSphere PowerCLI may fail to connect to vCenter Server 5.5 due to a Handshake failure. vSphere 5.5 uses the Open SSL library, which, for security, is configured by default to accept only connections that use strong cipher suites. On Windows XP or Windows Server 2003, the vSphere Client and vSphere PowerCLI do not use strong cipher suites to connect with vCenter Server.
"This results in the error No matching cipher suite on the server side, and a Handshake failure on the vSphere Client or vSphere PowerCLI side"
Background:
When installed on a Windows XP or Windows Server 2003 host machine, the vSphere Client and vSphere PowerCLI may fail to connect to vCenter Server 5.5 due to a Handshake failure. vSphere 5.5 uses the Open SSL library, which, for security, is configured by default to accept only connections that use strong cipher suites. On Windows XP or Windows Server 2003, the vSphere Client and vSphere PowerCLI do not use strong cipher suites to connect with vCenter Server.
- The solution is to allow weaker cipher in Vcenter5.5 and Esxi 5.5 Host
- Add the <cipherList>ALL</cipherList> parameter between the <ssl>...</ssl> section of the configuration file
- Please make sure you have a backup copy of the config file before edit
- For Windows-based vCenter Server
C:\ProgramData\VMware\VMware VirtualCenter\vpxd.cfg
For the vCenter Server Appliance
/etc/vmware-vpx/vpxd.cfg
For ESXi 5.5
/etc/vmware/rhttpproxy/config.xml
Wednesday, January 8, 2014
Veeam Backup & Replication 7.0 feature
Veeam Backup &
Replication 7.0

Inline data deduplication




Inline data deduplication
Veeam Backup & Replication deduplicates identical blocks
of data when backing up multiple VMs in one job, and eliminates empty space on
logical disks of VMs. Use of deduplication dramatically reduces storage costs:
you can reduce the backup size up to 90% when backing up VMs created from the
same template
Use changed block
tracking data check box is selected. For VMware VMs with hardware version 7 or
later, Veeam Backup & Replication employs VMware vSphere Changed Block
Tracking (CBT). Instead of scanning VMFS to know which data blocks have
changed since the previous job run, Veeam Backup & Replication queries the
CBT module to get the list of changed blocks. Use of CBT increases the speed
and efficiency of block-level incremental backups. For example, if only 5% of a
VM changed since the last backup, incremental backup will be performed 20 times
faster.
There are some facts about CBT:

http://helpcenter.veeam.com/backup/70/hyperv/changed_block_tracking.html
There are some facts about CBT:
- The CBT mechanism is implemented as a file system filter driver.
- Information on data blocks that have changed is registered in special .ctp files
- .ctp files are stored in the C:\ProgramData\Veeam\CtpStore folder on standalone Hyper-V hosts or on every node of the Hyper-V cluster.
- notes.txt file. This file contains basic information about the VM such as VM name and ID, and describes for which .vhd files changed block tracking is enabled.
- The backup window of incremental jobs may increase dramatically when CBT is disabled ,as Veeam Backup & Replication will read all of VM data to detect what blocks have changed since the last job run.
http://helpcenter.veeam.com/backup/70/hyperv/changed_block_tracking.html
Exclude swap file
blocks from processing check box is selected.
Swap files are dynamic and change intensively between runs
of a backup job. With this option selected, Veeam Backup & Replication will
identify data blocks of the Windows pagefile in the guest OS and exclude them
from processing, which will result in increased performance and a smaller size
of increments.
Application-aware
image processing, which will ensure
proper restore of VSS-aware applications. To back up running VMs with VSS-aware
applications (such as Active Directory, Microsoft SQL, Microsoft Exchange,
Sharepoint), Veeam Backup & Replication uses application-aware image
processing based on Microsoft VSS. Jobs with application-aware image processing
produce transactionally consistent backups, which, unlike crash consistent
backups, guarantee proper recovery of virtualized applications without any data
loss.
• Guest OS file indexing,
which will enable you to search for guest OS files in backed up VMs and restore
files in 1 click. With this option selected, Veeam Backup & Replication
creates a catalog (or index) of VM guest OS files. To learn about the 1-click
restore
Make sure that the Truncate
logs on successful backup only option is selected to correctly handle
transaction logs after the backup job is completed. In this case, if the backup
job finishes successfully, Veeam Backup & Replication will truncate
transaction logs so that they do not overflow storage space. If you use an
additional third-party backup tool that maintains consistency of transaction
logs, select the Do not truncate logs option to prevent possible
conflicts.
On the Indexing tab,
select the Index everything option to perform indexing of the
Monitor
job performance in real time
Recovery
Instant VM Recovery*, which uses the vPower technology to start a VM
directly from a compressed and deduplicated backup file. Instant VM Recovery
creates a "temporary spare" of the original VM and provides the
minimum restore time possible (several seconds to several minutes).
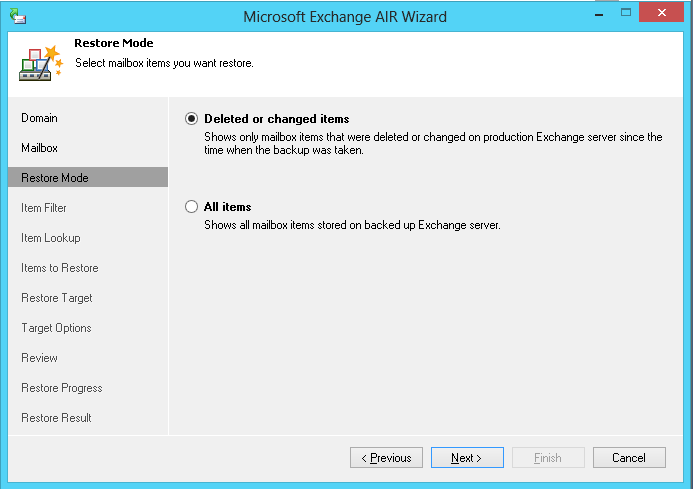
MICROSOFT EXCHANGE AIR WIZARD 7.0
RELEASE NOTES http://veeampdf.s3.amazonaws.com/release_notes/veeam_backup_ex_air_7_0_release_notes.pdf?AWSAccessKeyId=AKIAJI4MX44AEVG3NBLA&Expires=1389167061&Signature=fqZjtdX6VCUAgq4obl%2BZSByyLkc%3D
Performing
Item-Level Restore
Select the mailbox from which you want to
restore Microsoft Exchange items (e-mails, contacts, appointments and so on).
In the Mailbox account field, specify the account of the user whose
mailbox you want to access. To quickly find the necessary account, enter the
first characters of the account in the field and click Checkon the right or press [ENTER] on the keyboard. The Microsoft Exchange Recovery
wizard will form a list of available accounts starting with entered characters
so that you can choose the necessary one.
The information about the server hosting the
selected mailbox will be displayed in the lower part of the window.
If prompted, specify the credentials to be
used to access the specified mailbox in production environment.
NOTE:
This account should have sufficient access rights for the specified mailbox,
otherwise you will not be able to proceed. If necessary, contact your
Exchange administrator.
NOTE:
This account should have sufficient access rights for the specified mailbox,
otherwise you will not be able to proceed. If necessary, contact your
Exchange administrator.
Select the mode in which you want to restore items from the
selected mailbox. You can choose to work only with those items that have
changed since the point you selected, or work with all items in this mailbox.
At the Item Filter step
of the wizard, you can specify filter criteria that will help you find the
necessary item. Use the Add Criteria list
at the bottom of the window to add any item fields you need. Fill in the fields
so that the Microsoft Exchange Recovery wizard can apply the filter.
After you provide the search filter, the Microsoft Exchange
Recovery wizard will look for the necessary items and display the list of those
that match the specified criteria. Select check boxes next to the items you
want to restore. You can use the Mailbox item type field at the top to display items of
the necessary type only.
Specify to which location you want to restore
the selected item(s). You can restore items back to the original mailbox on the
production Microsoft Exchange server or save them as individual files to the
selected folder.
NOTE:
Microsoft Exchange Recovery wizard does not allow you to save items restored
from Microsoft Exchange 2010 to a file. For this reason,
the File system option is disabled for Microsoft Exchange 2010
Specify options for the mailbox or folder to which you want to restore Microsoft Exchange items.
Microsoft Exchange Recovery wizard does not allow you to save items restored
from Microsoft Exchange 2010 to a file. For this reason,
the File system option is disabled for Microsoft Exchange 2010
Specify options for the mailbox or folder to which you want to restore Microsoft Exchange items.
●If you have selected to restore
items to a mailbox, select the mailbox folder to which restored items should be
placed. You can additionally select to mark restored items as Unread. If you are restoring multiple mailbox items, you can select
the Preserve folder hierarchy check box to keep the
initial folder structure.
●If you have selected to restore
items to a folder, specify the path to the folder to which restored items
should be placed.
Review the settings you specified and click Restore.
The selected items will be restored to the specified mailbox/folder in the
production Microsoft Exchange server or saved as individual files to the
selected folder.
Other key enhancements include:
Virtual Lab functionality, including Sure
Backup, is now available for Microsoft Hyper-V. This allows item level restores
in SQL, Exchange and Active Directory using Veeam U-AIR wizards which have also
been updated in v7 making restores easier and quicker.
The ability to take backups from storage snapshots provides huge performance improvements, additional storage system support has been added into B&R v7 which now includes HP 3PAR/StoreServ and HP StoreVirtual VSA.
Veeam Explorer has been updated, adding-in support for Microsoft Sharepoint 2010 and Microsoft Exchange 2013, as well as now allowing restores to Office 365 and improving overall restore performance into existing Exchange environments.
The ability to take backups from storage snapshots provides huge performance improvements, additional storage system support has been added into B&R v7 which now includes HP 3PAR/StoreServ and HP StoreVirtual VSA.
Veeam Explorer has been updated, adding-in support for Microsoft Sharepoint 2010 and Microsoft Exchange 2013, as well as now allowing restores to Office 365 and improving overall restore performance into existing Exchange environments.
Performance improvements offered across both VMware and
Hyper-V environments include:
Change Block Tracking optimisations and
improved speed for file level recovery operations. Specific to VMware it is now
possible to transparently backup vCenter without the need to specify which host
it is running on and snapshots can be committed concurrently. With Hyper-V
there is now extended support available for ODX enabled storage and clustered
disks along with performance improvements for load balancing.
Insight into Guest OS Recovery
Together with full VM recovery, Veeam Backup & Replication
offers Instant File-Level Restore (IFLR) which lets you recover guest OS files
and folders from the VM backup. In contrast to competitive solutions, IFLR does not require a specific file-level
backup –restore of guest OS files, as well as all other restore options, are
available from the same image-level backup. Neither should you extract the
VM image from the backup prior to restore – VM guest OS files can be recovered
on-the-fly, directly from a regular backup (or from a VM replica). This makes
the restore process extremely fast and does not require you to provision
additional storage resources.
Veeam Backup & Replication provides three options for guest OS
files recovery:
• Recovery from Windows-based file systems (FAT, NTFS
and ReFS)
• Recovery from 15 most used file systems (including
Linux, Unix, BSD and soon) with the multi-OS restore wizard
• Universal File-Level
Recovery*for any OS or file system through leveraging the Instant VM Recovery
technology*
VM
guest OS files can be recovered to the latest state or any good to know point
in time.
Tuesday, December 17, 2013
Install / Upgrade VMware ESXi 5.5.0 GA from ESXi with USB drive on HPz420
The background:
As the workstation HP z420 is not in he HCL of the vsphere5.5 and I find that the network adapter is not recognized if installing the ESXi 5.5 host with the installation image from vmware. This error interrupt the installation process and it could not be skipped:

1. Try using the HP Custom Image for ESXi 5.5.0 GA Install CD-September 2013 -here to install the ESXi 5.5 but the network adapter still not to be detected.
2. The HP z420 come with Intel 82579LM nic on the X79 motherboard, we need use ESXi-Customizer to inject the 82579LM nic driver into the installation image, first download files in follow links:
ESXi-Customizer http://www.v-front.de/p/esxi-customizer.html
VIB file net-e1000e-2.1.4.x86_64.vib from http://ftp2.pl.freebsd.org/pub/VM/VMware/Drivers/net-e1000e-2.1.4.x86_64.vib
ESXi5.5 image from vmware download
3. The image marking process is straight forward, just prepare those files and click run

4. After the customized image file is ready, we convert it into usb boot image with UNettbootin
run the tool as administrator

 * The usb drive should be erase first to ensure no other boot files exist

5. Use the USB to boot the workstation.

6. Enter to continue


7. Press F11 to accept the EULA and continue

8. For upgrade , we can use F1 to view the disk detail and get where the system disk is

9. Press F11 for Upgrade

10. Select "Upgrade ESXi , preserve VMFS datastore"

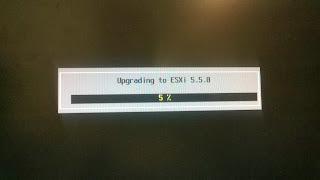
11. Wait the upgrade complete and restart the server
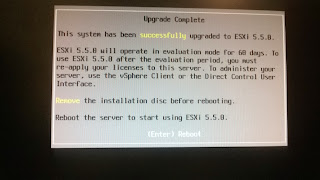
12. Include the BIOS information as reference

As the workstation HP z420 is not in he HCL of the vsphere5.5 and I find that the network adapter is not recognized if installing the ESXi 5.5 host with the installation image from vmware. This error interrupt the installation process and it could not be skipped:
"No network adapters were detected. Either no network adapters are physically connected .."

2. The HP z420 come with Intel 82579LM nic on the X79 motherboard, we need use ESXi-Customizer to inject the 82579LM nic driver into the installation image, first download files in follow links:
ESXi-Customizer http://www.v-front.de/p/esxi-customizer.html
VIB file net-e1000e-2.1.4.x86_64.vib from http://ftp2.pl.freebsd.org/pub/VM/VMware/Drivers/net-e1000e-2.1.4.x86_64.vib
ESXi5.5 image from vmware download
3. The image marking process is straight forward, just prepare those files and click run

4. After the customized image file is ready, we convert it into usb boot image with UNettbootin
run the tool as administrator

 * The usb drive should be erase first to ensure no other boot files exist
5. Use the USB to boot the workstation.

6. Enter to continue


7. Press F11 to accept the EULA and continue

8. For upgrade , we can use F1 to view the disk detail and get where the system disk is

9. Press F11 for Upgrade

10. Select "Upgrade ESXi , preserve VMFS datastore"


11. Wait the upgrade complete and restart the server

12. Include the BIOS information as reference
Subscribe to:
Posts (Atom)